API Authentication Guide
Learn how to authenticate with the FormRobin API. FormRobin supports two authentication methods: JWT login with credentials and Personal Access Tokens for password-free API access.
Authentication Methods Overview
FormRobin provides two ways to authenticate with the API. Both methods produce a Bearer token used in the Authorization header:
- Method 1: JWT Login - Send your email and password to get a token programmatically. Best for automated scripts where you manage credentials securely.
- Method 2: Personal Access Tokens - Create long-lived tokens from the Settings UI without sending credentials per request. Best for integrations and third-party tools.
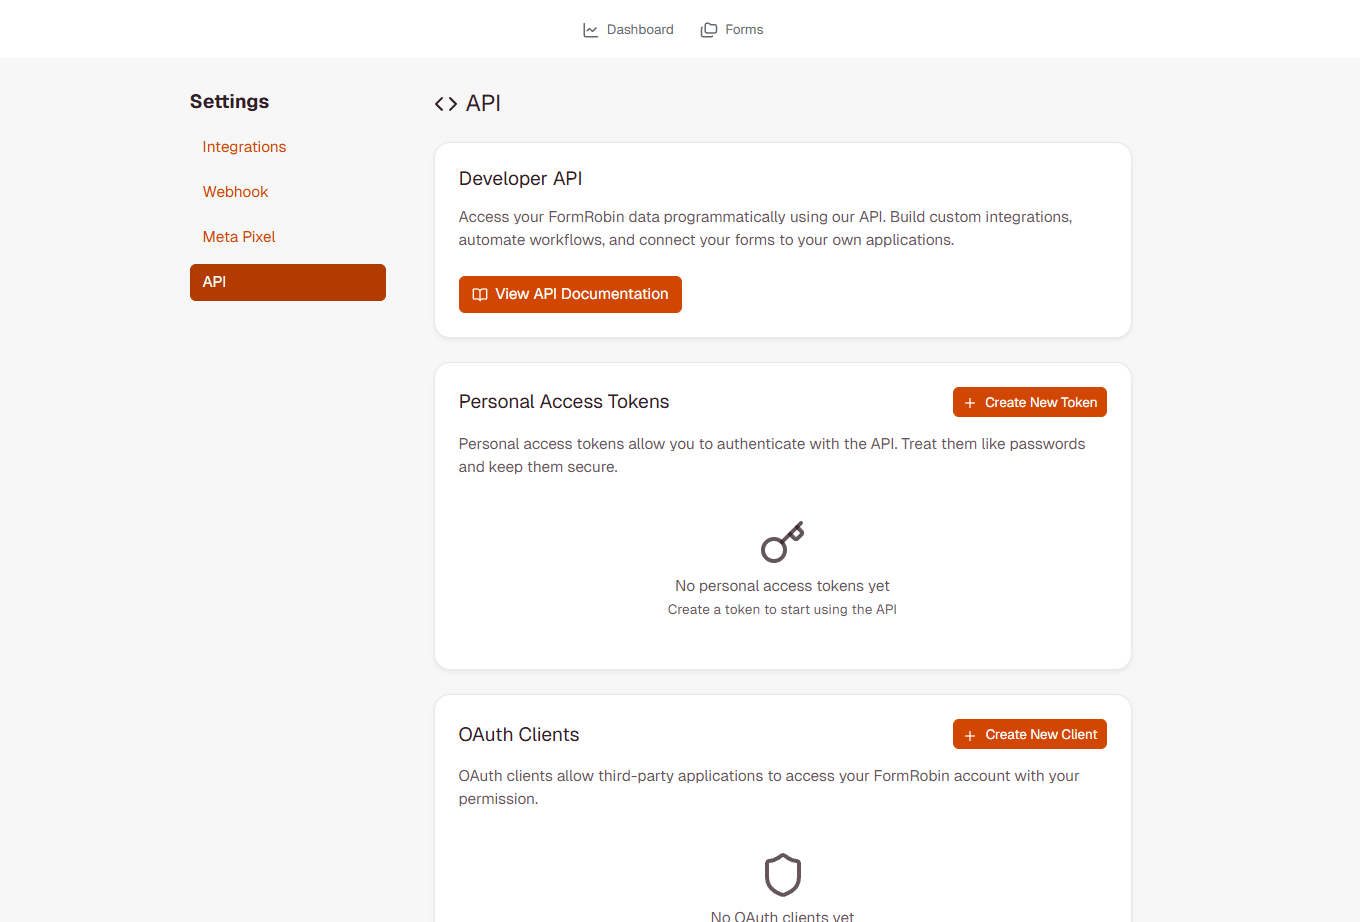
You can manage tokens and OAuth clients from Settings > API in your FormRobin account:
Method 1: JWT Login
Use the JWT login endpoint to exchange your email and password for an access token.
Login Endpoint
POST https://forms.formrobin.com/api/jwt/login
Request Format
Headers:
Content-Type: application/json
Accept: application/json
Body (JSON):
{
  "email": "your-email@example.com",
  "password": "your-password"
}
Alternatively, you can use username instead of email:
{
  "username": "your-email@example.com",
  "password": "your-password"
}
Success Response
Status: 200 OK
Body:
{
  "access": "eyJ0eXAiOiJKV1QiLCJhbGc...",
  "token_type": "bearer",
  "expires_in": 31536000
}
- access: Your JWT token (store this securely)
- token_type: Always "bearer"
- expires_in: Token lifetime in seconds (typically 1 year)
Error Response
Status: 401 Unauthorized
Body:
{
  "error": "Unauthorized"
}
This error means your email or password is incorrect.
Method 2: Personal Access Tokens
Personal Access Tokens let you authenticate with the API without sending your email and password in each request. You create tokens from the FormRobin Settings UI and use them as Bearer tokens in the Authorization header.
Creating a Token
- Log in to your FormRobin account.
- Go to Settings > API.
- Under Personal Access Tokens, click Create New Token.
- Enter a descriptive Token Name (e.g., "My Integration" or "Zapier Connection").
- Click Create Token.
- Your token will appear in a yellow banner at the top of the page. Click Copy to copy it.
Important: The token is shown only once. Copy and store it securely immediately. You will not be able to view the token again after navigating away from the page.
Using a Personal Access Token
Use the token exactly the same way as a JWT token, in the Authorization header:
Authorization: Bearer YOUR_PERSONAL_ACCESS_TOKEN
Example with cURL:
curl -X GET https://forms.formrobin.com/api/v1/forms \
  -H "Authorization: Bearer YOUR_PERSONAL_ACCESS_TOKEN" \
  -H "Accept: application/json"
Managing Tokens
You can view and manage all your tokens at Settings > API. The tokens table shows:
- Name - The descriptive name you gave the token
- Created - When the token was created
- Delete - Remove the token (this cannot be undone)
To delete a token, click the Delete button next to it and confirm the deletion. Any applications using that token will immediately lose API access.
OAuth Clients
OAuth clients allow third-party applications to access your FormRobin account with your permission. This is useful when building applications that need to authenticate on behalf of users.
Creating an OAuth Client
- Go to Settings > API.
- Under OAuth Clients, click Create New Client.
- Enter a Client Name (e.g., "My Application").
- Enter a Redirect URL (e.g.,
https://example.com/callback) - this is where users will be redirected after authorization. - Click Create Client.
- Your Client Secret will appear in a yellow banner. Copy and store it securely.
Important: The Client Secret is shown only once. You will not be able to view it again after navigating away.
Managing OAuth Clients
The OAuth Clients table shows:
- Name - The client application name
- Client ID - The unique identifier for your client (this is always visible)
- Redirect URL - The authorized callback URL
- Edit - Update the client name or redirect URL
- Delete - Remove the client permanently
To edit a client, click Edit to update the name or redirect URL. The Client ID cannot be changed. To delete a client, click Delete and confirm.
Using Your Token
Regardless of which method you used to obtain a token (JWT login or Personal Access Token), include it in the Authorization header of all API requests:
Authorization: Bearer YOUR_ACCESS_TOKEN_HERE
Complete Example Request
GET https://forms.formrobin.com/api/v1/forms
Headers:
Authorization: Bearer eyJ0eXAiOiJKV1QiLCJhbGc...
Content-Type: application/json
Accept: application/json
Rate Limiting
The FormRobin API enforces a rate limit of 60 requests per minute. The limit is applied:
- Per user for authenticated requests (based on your user ID)
- Per IP address for unauthenticated requests
If you exceed the rate limit, the API will return a 429 Too Many Requests response. Wait until the next minute window before retrying.
Best practices for staying within rate limits:
- Cache API responses where possible
- Batch operations instead of making individual requests
- Add a small delay between rapid sequential requests
- Monitor for 429 responses and implement exponential backoff
Code Examples
cURL Example
# Step 1: Login and get token
curl -X POST https://forms.formrobin.com/api/jwt/login \
  -H "Content-Type: application/json" \
  -H "Accept: application/json" \
  -d '{
    "email": "your-email@example.com",
    "password": "your-password"
  }'

# Step 2: Use token in subsequent requests
curl -X GET https://forms.formrobin.com/api/v1/forms \
  -H "Authorization: Bearer YOUR_TOKEN_HERE" \
  -H "Accept: application/json"
JavaScript (Fetch API) Example
// Step 1: Login
const loginResponse = await fetch('https://forms.formrobin.com/api/jwt/login', {
  method: 'POST',
  headers: {
    'Content-Type': 'application/json',
    'Accept': 'application/json'
  },
  body: JSON.stringify({
    email: 'your-email@example.com',
    password: 'your-password'
  })
});

const { access: token } = await loginResponse.json();

// Step 2: Use token
const formsResponse = await fetch('https://forms.formrobin.com/api/v1/forms', {
  headers: {
    'Authorization': `Bearer ${token}`,
    'Accept': 'application/json'
  }
});

const forms = await formsResponse.json();
Python (requests) Example
import requests

# Step 1: Login
login_url = 'https://forms.formrobin.com/api/jwt/login'
login_data = {
    'email': 'your-email@example.com',
    'password': 'your-password'
}
login_response = requests.post(login_url, json=login_data)
token = login_response.json()['access']

# Step 2: Use token
forms_url = 'https://forms.formrobin.com/api/v1/forms'
headers = {
    'Authorization': f'Bearer {token}',
    'Accept': 'application/json'
}
forms_response = requests.get(forms_url, headers=headers)
forms = forms_response.json()
Checking Authentication Status
To verify your token is valid and get current user info:
GET https://forms.formrobin.com/api/user
Headers:
Authorization: Bearer YOUR_TOKEN
Accept: application/json
Response:
{
  "id": 123,
  "name": "Your Name",
  "email": "your-email@example.com",

  ...
}
Token Expiration and Refresh
JWT tokens expire after the time specified in expires_in (typically 1 year). When a token expires:
- API requests return 401 Unauthorized
- You must obtain a new token by logging in again
- No refresh token mechanism is currently available
Personal Access Tokens do not expire automatically. They remain valid until you delete them from Settings > API.
Recommended Strategy
// Pseudo-code for handling expiration
function makeApiRequest(url) {
  response = fetch(url, { headers: { Authorization: `Bearer ${token}` } });

  if (response.status === 401) {
    // Token expired - login again or create a new Personal Access Token
    token = loginAndGetNewToken();
    // Retry the request
    response = fetch(url, { headers: { Authorization: `Bearer ${token}` } });
  }

  return response;
}
Storing Tokens Securely
Best Practices:
- Server-side only: Never expose tokens in client-side JavaScript or mobile apps
- Environment variables: Store tokens in environment variables, not in code
- Encrypted storage: Encrypt tokens when storing in databases
- Never commit: Don't commit tokens to version control (Git)
- Rotate regularly: Regenerate tokens periodically for security
Security Best Practices
- HTTPS only: Always use HTTPS for API requests
- Strong passwords: Use a strong password for your FormRobin account
- Token rotation: Regenerate tokens if you suspect compromise
- Least privilege: Only share tokens with authorized systems
- Monitor usage: Watch for unexpected API activity
- Secure transmission: Never send tokens via unencrypted channels
- Delete unused tokens: Remove Personal Access Tokens you no longer need from Settings > API
Limitations
- No refresh tokens: Must re-authenticate (JWT) or create a new Personal Access Token when a JWT token expires
- Account-level access: Tokens grant full access to your account
- No scopes: Cannot limit token permissions to specific API endpoints
- Rate limited: 60 requests per minute per user (or per IP if unauthenticated)
Troubleshooting
Issue: 401 Unauthorized when logging in.
Fix: Verify your email and password are correct. Check that your account is active and not suspended. Ensure you're sending the request to the correct endpoint (/api/jwt/login). Try logging in via the website first to confirm credentials.
Issue: 401 Unauthorized on API requests (but login worked).
Fix: Verify the Authorization header is formatted correctly: Authorization: Bearer YOUR_TOKEN (note the space after "Bearer"). Check that the token hasn't expired. Ensure you're using the access value from the login response, not the entire response object.
Issue: Token format looks wrong or truncated.
Fix: JWT tokens are long strings (typically 500+ characters). Ensure you're storing and sending the complete token. Check for any string truncation or encoding issues in your code.
Issue: Getting CORS errors in browser.
Fix: The API is meant for server-side use. If you must use it client-side, check your server-side implementation. Consider proxying requests through your backend instead of calling the API directly from the browser.
Issue: 429 Too Many Requests.
Fix: You have exceeded the rate limit of 60 requests per minute. Wait for the next minute window, then retry. Implement caching and exponential backoff in your application to avoid hitting the limit.
Issue: Personal Access Token not working after creation.
Fix: Ensure you copied the complete token when it was displayed. The token is shown only once. If you lost it, delete the token from Settings > API and create a new one.
FAQ
Q: How long do access tokens last?
A: JWT tokens from the login endpoint typically last for 1 year (31,536,000 seconds). The exact duration is returned in the expires_in field. Personal Access Tokens do not expire automatically and remain valid until deleted.
Q: Can I generate tokens without a password?
A: Yes. Go to Settings > API and create a Personal Access Token. Once created, you can use it in the Authorization: Bearer header without needing to send your password in API requests.
Q: Can I use one token across multiple applications?
A: Yes, but it's not recommended. If one application is compromised, all applications are at risk. Create separate Personal Access Tokens for each application so you can revoke them individually.
Q: Is there a way to revoke a token?
A: Yes. For Personal Access Tokens, go to Settings > API and click Delete next to the token. For JWT tokens obtained via login, changing your account password will invalidate all existing JWT tokens.
Q: What is the API rate limit?
A: The API allows 60 requests per minute per authenticated user, or per IP address for unauthenticated requests.
Need help with API authentication? Contact our support team - we're here to help!